
2.5.1. Open edX Administrator#
2.5.1.1. What is Open edX?#
The Open edX platform is at the core of the Global Teacher Campus platform.
Open edX is an open-source online learning platform that enables the creation and delivery of online courses and educational content. It is a robust and flexible platform educational institutions, businesses, and organizations use to offer Massive Open Online Courses (MOOCs), traditional online courses, and various learning experiences.
Here are some key features that Open edX provides for the GTC platform:
Course Creation and Configuration: Open edX provides educators and content creators the tools to design, develop, and configure their online courses. It supports various content types, including videos, text, quizzes, assignments, and interactive exercises.
Course Delivery and Operation: Open edX provides the LMS or learning management system capability for learners to access and take the courses.
Discussion Forums: As part of the LMS, the platform includes discussion forums where students can interact with instructors and peers, fostering collaboration and community building.
Certification and Credentialing: As part of the LMS, Open edX allows institutions to issue certificates to students who complete courses, providing recognition of their achievements.
Open edX was initially developed by edX, a nonprofit online education organization founded by Harvard University and the Massachusetts Institute of Technology (MIT). While edX continues to use and contribute to the long-term evolution and support of the platform, Open edX is stewarded by Axim Collaborative, a nonprofit created by Harvard University and MIT, to broaden access to high-quality education and maximize its impact worldwide. Moreover, the open-source nature of this technology has led to a diverse community of contributors and adopters, including universities, corporations, and government entities, who have extended its capabilities and adapted it to various educational contexts. This collaborative effort has helped make high-quality online education accessible to learners worldwide, and it is referred to as the Open edX community.
Since the Open edX platform is composed of two main applications, the LMS primarily for students and instructors and Studio for course creators, administrators could also refer to chapters 2.1 and 2.2 of this documentation to get acquainted with the functionalities of these applications.
2.5.1.2. The Role of the Open edX Administrator#
The role of the Open edX Administrator starts once the platform is installed and configured. Refer to the technical information chapter in this documentation for information about the installation and configuration processes.
Everyday tasks performed by administrators include the management of users and their permissions, managing key data objects in the platform, and sporadic adjustments in configurations as required by the evolving needs of the online learning initiative. All these tasks are performed from an interface called the Django administrator console.
2.5.1.3. Accessing the Administrator Consoles in Open edX#
To log into the Django administrator console, go to https://<LMSDOMAIN>/login to initiate a session in the platform with your user credentials. Sure that you are using a set of credentials that have been granted staff or super admin level permissions in the platform.
Then, visit https://<LMSDOMAIN>/admin to enter the Django administrator console.
2.5.1.4. Managing the Key Objects in Open edX#
2.5.1.4.1. Organizations#
Each tenant site is associated with one or more Organizations. When dealing with courses and ORGs, it is essential to be careful with the case sensitivity because some (unfortunately not all) validations inside Open edX are case-sensitive. The worst scenario is when some courses are created with one version of the organization and others with a different version (for example, UNESCO).
2.5.1.4.2. Tenants (Sites)#
The GTC platform leverages some advanced and extended capabilities of the Open edX platform to allow multi-tenant configuration. That means multiple sites or tenants run from the same platform, even if they are delivered in different domains and configurations.
You must create each new tenant and populate its configurations from the Django administrator console:
Access the Django administrator console.
Visit https://<LMSDOMAIN>/admin/eox_tenant/tenantconfig/.
Create the new record and provide a unique identifier for the external key.
Populate the LMS configurations field with the required configurations.
After the site’s creation, the Technology support team must also intervene to ensure that the site is properly configured to start operating.
2.5.1.4.3. Users#
- Create a user.
An administrator does not create regular users; the user must register themselves first using the registration form at https://<LMSDOMAIN>/register.
- Activate a user manually.
Upon registration, each user account needs to be activated by a process that requires the user to receive a verification email in their email inbox and click on an activation link. On rare occasions, users may have difficulties receiving or accessing the activation email so an administrator can manage to activate their accounts.
To manually activate a user, visit https://LMSDOMAIN/admin/auth/user/. Please search for the name or email of the specific user and access its record. Check the Active box and save the changes.
- Delete a user.
Open edX does not have an easy way for users to be deleted by an admin.
In compliance with GDPR, users can request their account removal in the latest version. Still, this does not delete it internally but anonymizes it (except for the username, which is left the same).
If someone needs to remove any user, the technology support team should perform this very carefully, affecting the databases directly.
A more accessible alternative is to disable the user by:
Use the Django sysadmin console at https://LMSDOMAIN/admin/auth/user/ to find the user you want to remove and change the email so that this user cannot log in or change the password.
Manually remove all the user enrollment in courses from the Django console https://LMSDOMAIN/admin/student/courseenrollment/.
2.5.1.4.4. User Permissions#
- Grant Staff or Super-Admin permissions to another user.
After the new user has been created and activated with the standard procedures:
Visit https://<LMSDOMAIN>/admin/auth/user/.
Please search for the name or email of the specific user and access its record.
Check the is staff box or the is super-admin box and save the changes.
- Grant course creation permissions to a user
Studio shows users an option in the dashboard to request the course creation privilege.
When a regular Studio user requests course creation permissions from their dashboard in Studio, you can grant it or refuse by visiting the Django sysadmin console, but not the LMS one, but the one for Studio:
Log in as a superuser to https://STUDIODOMAIN/.
Visit https://<STUDIODOMAIN>/admin/course_creators/.
Locate the request and modify it to the desired user to the state Granted.
Course creator permissions can also be granted in bulk by uploading a CSV file with the list of user emails and the organizations needing course creation permissions.
After the system processes the file, it will provide the list of emails that did not get the correct permissions. The common reason for not getting the licenses is that the user still needs to be created with that particular email or because the email is in an invalid format.
Note
Open edX does not allow the creation of new course creators records from the Django sysadmin console, not even to super admins, so the way to proceed is to have the author create their request first, and then approve the request from the sysadmin console.
2.5.1.4.5. Certificate Templates#
The way that course certificates look and behave can be altered to some extent by administrators.
The platform will use an HTML template to render the information of a particular learner when displaying the certificate, and you can manage this template from the Django administrator console. You can also create new templates as needed
Access the Django administrator console.
Visit https://<LMSDOMAIN>/admin/certificates/certificatetemplate/.
Select the specific template you want to modify.
Make the changes carefully in the HTML.
Save the changes.
You can configure a certificate template to apply it to all the courses in an organization or to a particular course by its course_id.
2.5.1.4.6. Email Templates#
The way course emails look, and the complementary information they carry can be altered to some extent by administrators. The platform will use an HTML template to build the content of the emails, and this template can be managed from the Django administrator console.
Access the Django administrator console.
Visit https://<LMSDOMAIN>/admin/bulk_email/courseemailtemplate/.
Select the specific template you want to modify.
Make the changes carefully in the HTML.
Save the changes.
2.5.1.4.7. Courses#
The Open edX platform needs to provide a more complex interface for deleting a course or a library; this is a cumbersome procedure that has to be carefully performed. For this reason, a two-step approach is proposed: in the first step, the course creator or the administrator will mark the course or library for deletion, and that alone will be enough to get rid of a particular course, but it will not yet be removed from the databases. In the second step, the technology support team will take care of removing the courses or libraries that have been marked for deletion.
For this process, follow these steps:
- Get the list of enrolled learners.
First, go to the course on the LMS platform, go to the Instructor tab, and download a profile information report, which will have the complete list of learners enrolled in the course.
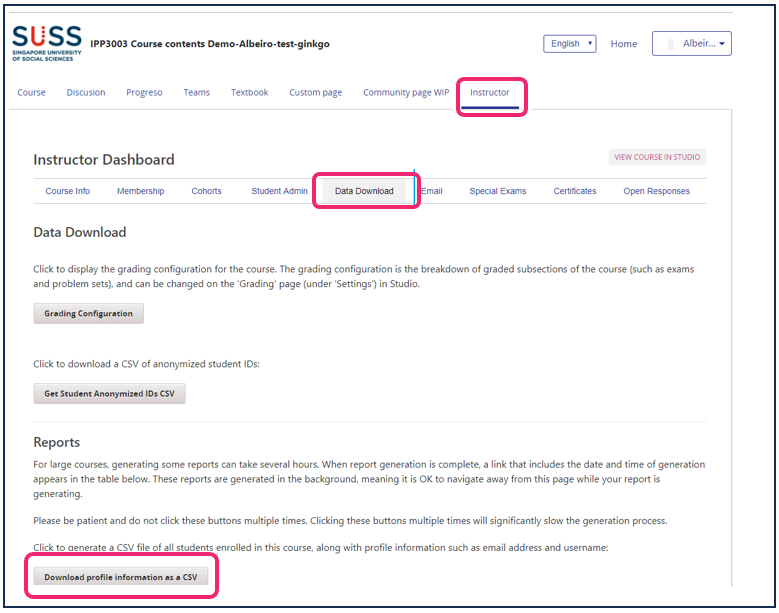
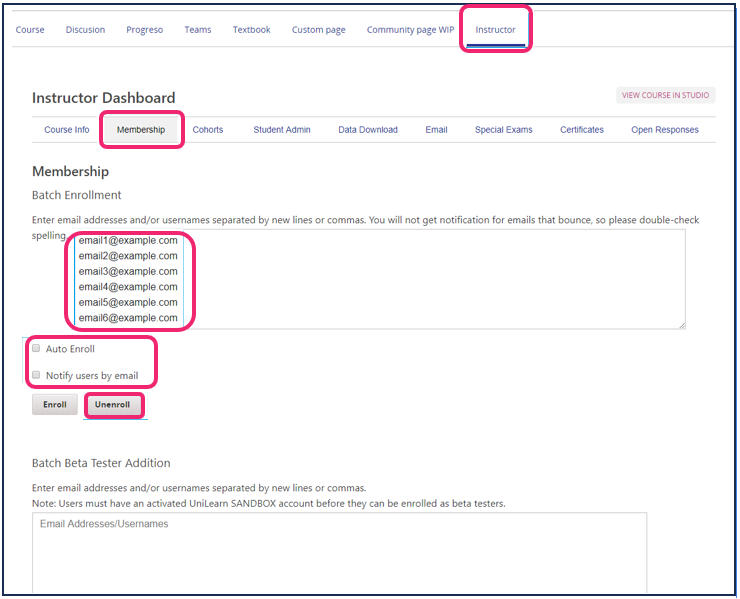
- Unenroll all learners from the course.
From the file you downloaded, select all the email addresses. Go to Instructor-membership-batch enrollment, and paste all the email addresses in the box. Then, uncheck the auto enroll and notify users by email options. Select Unenroll.
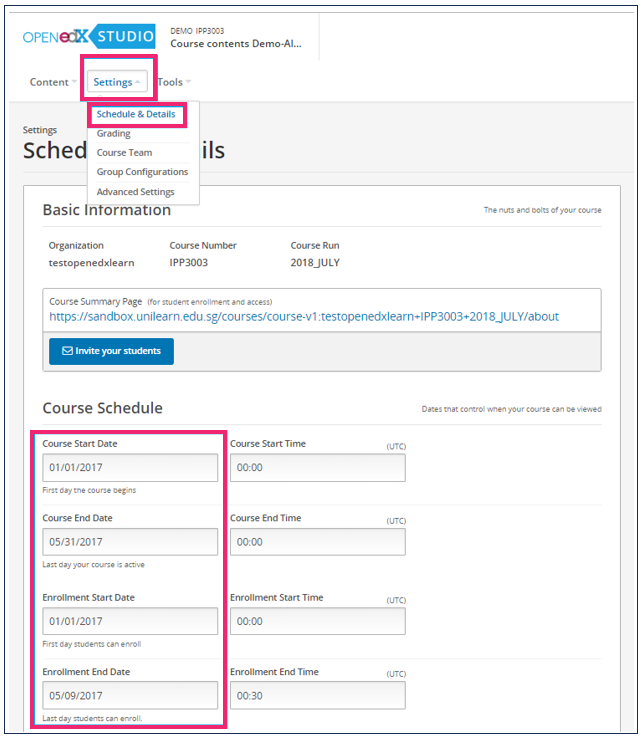
- Change the course dates.
Now, you should go to the schedule and details page in the Studio platform and change the enrollment start date and enrollment end date to any date in the past.
- Change the course visibility
Now, you should go to the course in Studio. Then, go to Advanced settings, select the field Course Visibility In Catalog, and type none in it. Doing so ensures that students or admins users cannot see the course again.
- Change the course name.
For easy detection of the courses we should delete, you may change the name of the course to mark it as a course for deletion. In this case, on Studio, click on Settings dropdown menu and select Advanced settings. There, on the Course display name, change the course name to, for example: “ZZZ course marked for deletion.”
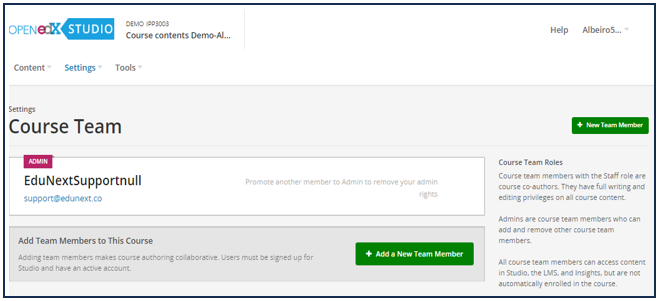
- Edit the course team.
Then, you shall go to the course team page and delete all team members. By following these steps, the course will stop being visible to learners and instructors so that it will be removed from your site for most practical effects. However, the course and its record will still exist for a while.
- Inform the course ID.
Inform the course ID of the technology support team and request the final deletion of the course records.
Note
Please do this process for the course you want to delete. If a course is marked for deletion by mistake and it gets deleted, it will not be possible to recover the information afterward.
2.5.1.4.8. Course modes#
Before you can generate certificates and award them to learners, you have to run the following configuration procedure:
Access the Django administrator console.
Visit https://<LMSDOMAIN>/admin/course_modes/coursemode/.
Search for the specific course by its course_id.
Make sure there is a course mode “Honor” for the exact course ID, or if the record is not found, create a new record for that course_id with the “Honor” type.
2.5.1.5. Managing the Key Objects in the Custom Course Validation Workflow#
The Global Teacher Campus Platform is based on the Open edX platform. Still, it has also been augmented with a customized component that changes the way some of the platform objects work to implement a course validation workflow, which is a process in which course Outdoors will need to submit their courses for a properly accredited validator to review on this user will either reject or accept the course before it gets to be published.
As a platform administrator, you may need to interact with some of the data objects that pertain to the course validation workflow, which this section will describe in detail.
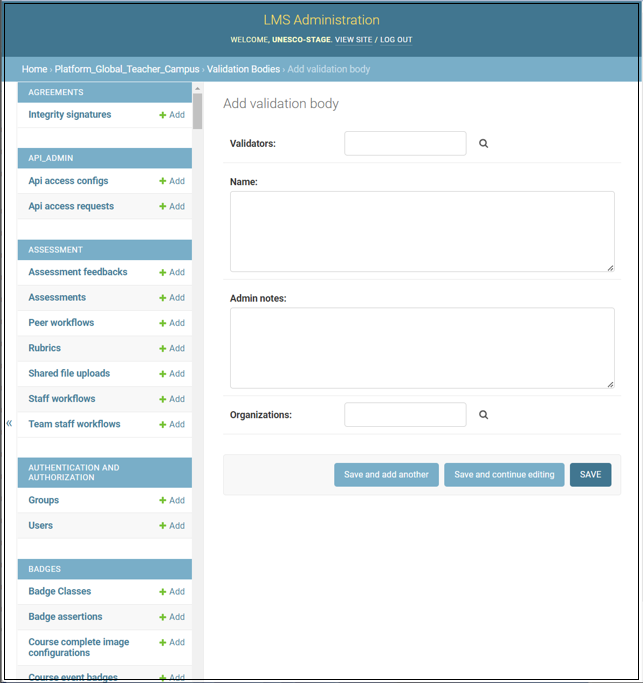
2.5.1.5.1. Validation Bodies#
Validation bodies are the institutions in charge of the review and approval or rejection of the different courses that course creators create.
They are created in the platform and linked to one or more Open edX organizations to represent that this validation body will oversee the courses created in Open edX for that particular organization.
Validation bodies are also linked with a particular type of user called a validator.
To create a validation body, follow these steps:
Access the Django administrator console.
Visit https://<LMSDOMAIN>/admin/platform_global_teacher_campus/validationbody/.
Click on the Add validation body button.
Provide a descriptive name and additional description or explanation for internal use only.
Save the changes.
To link a validation body to a particular organization:
Access the Django administrator console.
Visit https://<LMSDOMAIN>/admin/platform_global_teacher_campus/validationbody/.
Search for the specific validation body and click on its name to access the record.
Provide one or more organizations by their numeric IDs. When adding more than one, use a comma-separated list of IDs.
Save the changes.
2.5.1.5.2. Validators#
Validators are a particular type of user associated with a specific validation body.
These users need to be created and activated following the standard creation process, which entails filling in the registration form and then starting the user by clicking a link received on the user’s email.
To link a validation body to a particular user to make this user a validator:
Access the Django administrator console.
Visit https://<LMSDOMAIN>/admin/platform_global_teacher_campus/validationbody/.
Search for the specific validation body and click on its name to access the record.
Provide one or more users by their numeric IDs. When adding more than one, use a comma-separated list of ids.
Save the changes.
2.5.1.5.3. Course Categories#
To submit a course for validation, Course Outdoors must categorize their content by selecting one of the available course categories.
Course categories can be created or maintained by an administrator following the steps below:
Access the Django administrator console.
Visit https://<LMSDOMAIN>/admin/platform_global_teacher_campus/coursecategory/.
Click on the Add course category button to add a new category or search for the specific category and click on its name to access the record.
Provide or update the information for each of the fields.
Save the changes.
2.5.1.5.4. Rejection Reasons#
When reviewing a particular course, validators can opt to reject it, and they will need to select why the course is being rejected.
These reasons can be created and maintained by an administrator following the steps below:
Access the Django administrator console.
Visit https://<LMSDOMAIN>/admin/platform_global_teacher_campus/validationrejectionreason/.
Click on the Add rejection reason button to add a new cause, or search for the specific reason and click on its name to access the record.
Provide or update the information for each of the fields.
Save the changes.
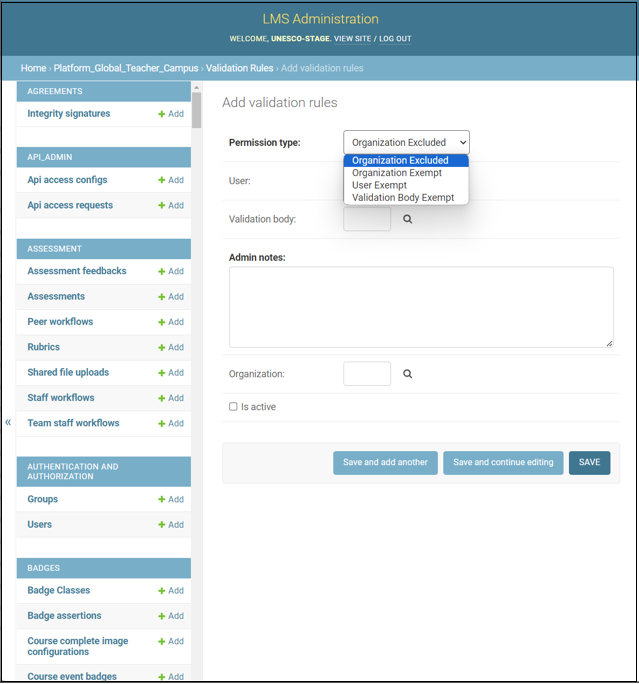
2.5.1.5.5. Validation Rules#
The system provides some flexibility in the configuration to accommodate exceptional circumstances where users can apply different rules.
There are four types of validation rules: - An organization can be excluded from the validation process. - An organization can be exempted from the validation process. - A user can be exempted from the validation process. - The evaluation body can be exempted from the validation process.
Exemptions in this context imply that the course valuation process needs to be started, but its outcome is automatically set as approved without any intervention from a validator.
Exclusion in this context implies that the course valuation process does not need to be started, and the course will still be listed to the public.
As an administrator, you can create or interact with the different validation rules by following the steps below:
Access the Django administrator console.
Visit https://<LMSDOMAIN>/admin/platform_global_teacher_campus/validationrules/.
Click the Add validation rule button to add a new rule, or search for the specific direction and click on its name to access the record.
Provide or update the information for each of the fields.
Save the changes.
2.5.1.5.6. Validation Status Messages#
After the evaluator has decided on the status of a particular course, the course author who submitted the content will be able to see the result and a specific description for it.
An administrator can maintain these descriptions to provide more clarity to the users according to the specific circumstances of the particular initiative.
To modify the status messages, follow the steps below:
Access the Django administrator console.
Visit https://<LMSDOMAIN>/admin/platform_global_teacher_campus/validationstatusmessage/.
Create or modify the record for each of the possible statuses a course can get:

Provide the specific message that course creators will see on their screens.
Save the changes.
2.5.1.5.6.1. Validation Status#
This table summarizes the way the statuses have been designed.
Status |
Description |
|---|---|
null |
This is not a state of the validation process. This is used to signify a course with no course validation process associated with it. Thus, there is no status. |
submitted |
The course author considers it ready and has submitted it for review, but the review process has yet to start. |
in-review |
The review process has started. |
draft |
The reviewer has requested changes; after they are done, it will need to be resubmitted. |
approved |
The evaluation process has finished, and the content has been approved. |
disapproved |
The course has been rejected with some feedback. |
cancelled |
The validation process has been canceled, and it no longer affects the course. |
exempt |
The course organization was linked to an arrangement of organization and validation body marked for exemption or was created by a course author marked for exemptions. |