
3.7.6. Post Installation addition of a new tenant in both Open edX and Richie CMS#
After the GTC platform has been fully installed and deployed, new tenants can be added to the platform leveraging the multitenant capability.
This procedure entails the following interventions:
3.7.6.1. Build and deployment of the new site in Richie CMS#
Be aware that despite the fact that Django CMS does support multitenancy, so you could in principle run more than one website from the same Django CMS installation, Riche, the adaptation of Django CMS that is used by the GTC platform does not. This means that for each new tenant that needs to be added to the GTC platform, an independant Richie installation would need to be created, basically following the same instructions described in the previous sections and using the ednx-richie-site-factory repository.
# Make sure you duplicate the contents of ednx-richie-site-factory/sites/unesco, into a new folder and nametag, for example, ednx-richie-site-factory/sites/secondsite and edit the contents with the specific configurations for this site.
# Run the activation command for this new site: export RICHIE_SITE=secondsite
# Check your environment with: make info RICHIE_SITE: secondsite
Now we can start the new project by executing.
make bootstrap


#. This command builds the containers, starts the services and performs database migrations.
make superuser
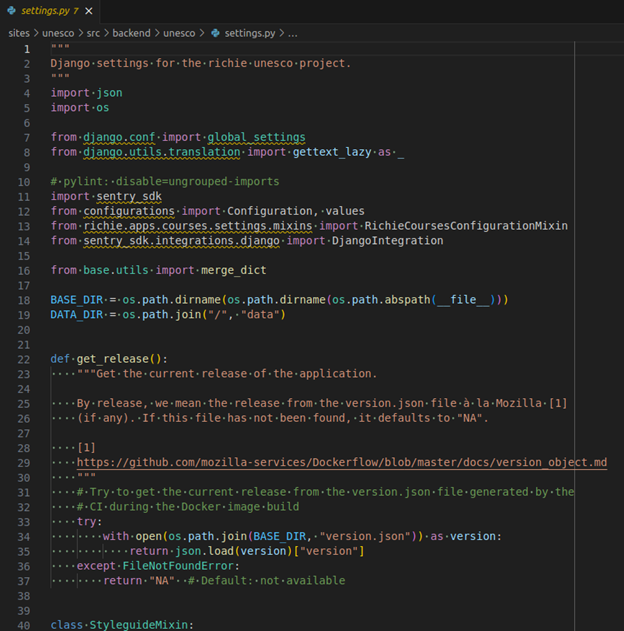
To make any changes to the Django configuration for the additional project you can modify the settings.py file located at sites>secondsite>src>backend>secondsite.
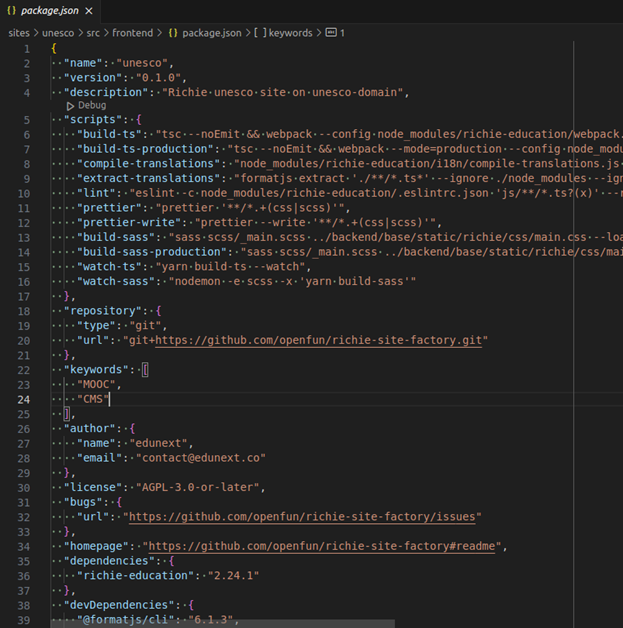
On the other hand, to modify the react settings, you can modify the package.json file located at sites>secondsite>src>frontend.
3.7.6.2. Enablement of the new tenant URLs in Open edX#
The Open edX platform does have the multi tenant capability to host additional sites without the need to perform an additional installation. However, depending on the way that domains and network traffic is managed in the environment where the tenant is to be added, the list of new domains that are going to be receiving trafic need to be enabled in the configuration.
these configuration lines exemplify the addition of a new tenant with all its required subdomains for the example domain YOUR_LMS2_DOMAIN.
DRYDOCK_INGRESS: true
DRYDOCK_INGRESS_EXTRA_HOSTS:
- courses.YOUR_LMS2_DOMAIN
- files.YOUR_LMS2_DOMAIN
- apps.YOUR_LMS2_DOMAIN
- minio.YOUR_LMS2_DOMAIN
- notes.YOUR_LMS2_DOMAIN
- superset.YOUR_LMS2_DOMAIN
Once this changes have been made, the Open edX application needs to be redeployed.
3.7.6.3. Configurations for the new site in Richie CMS#
Once the new Richie CMS platform is operational, it also needs to be populated with a minimal set of records to make it operational and fit for purpose.
3.7.6.3.1. Definition of the Site#
You need to create a simple record to define the existence of your site.
Access the Django administrator console with the Richie administrator credentials at https://YOUR_CMS2_DOMAIN/admin/.
Visit https://YOUR_CMS2_DOMAIN/admin/sites/site/.
Create a new record for the site and provide the value for YOUR_CMS2_DOMAIN and a Display name.
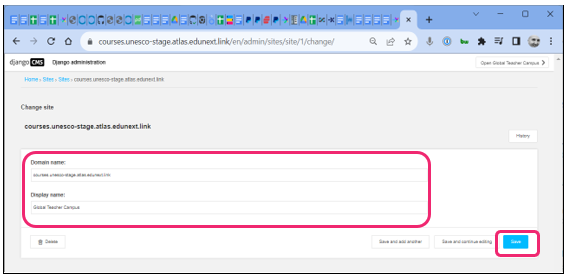
Save your changes.
3.7.6.3.2. Definition of a Homepage#
A homepage needs to be created for your additional Rihie CMS site.
Login to the Richie administrator interface with your Admin credentials at https://YOUR_CMS2_DOMAIN/admin/.
From the top menu, navigate to Page > Create Page > and select New Page option.
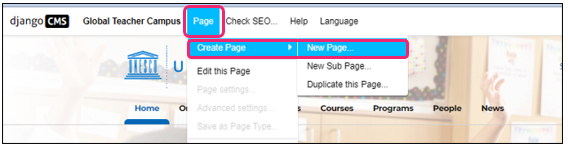
Provide a title and the desired Slug.
Select Save and continue editing.
Select Advanced settings.
Select the Homepage template.
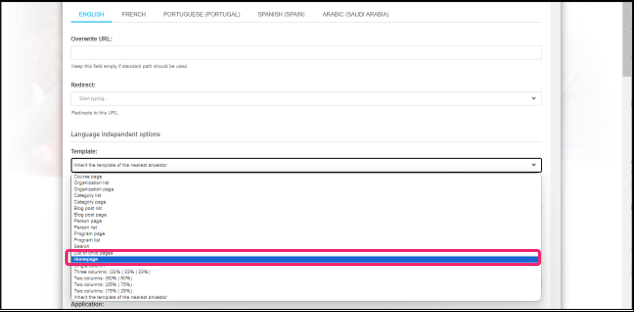
Select Save.
3.7.6.3.3. Definition of the Second Organization#
In order to maintain consistency with the Open edX platform, every organization that is created there, also needs to be created in Richie CMS. As part of the initial configurations for this additional Richie site, we are going to create one organization my_second_organization both in Richie and in Open edX.
This section will describe the process for Richie CMS step by step.
Login to the Richie administrator interface with your Admin credentials at https://YOUR_CMS2_DOMAIN/admin.
Go to the Create button to create a new organization page.

Select the blue box New Organization and then click on Next.

glo
Provide the organization title and make sure that the slug is my_second_organization, then go to the button Create.
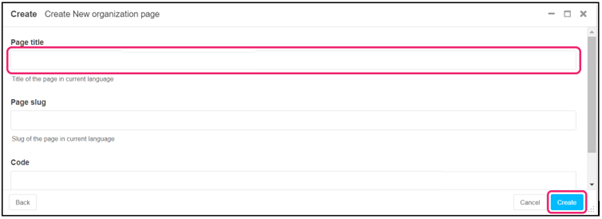
Save your changes.
3.7.6.3.4. Definition of the Course Catalog Page#
Login to the Richie administrator interface with your Admin credentials at https://YOUR_CMS2_DOMAIN/admin/.
From the top menu, navigate to Page > Create Page > and select New Page option.
Provide a title and the desired Slug.
Select Save and continue editing.
Select Advanced settings.
Select the Search template.
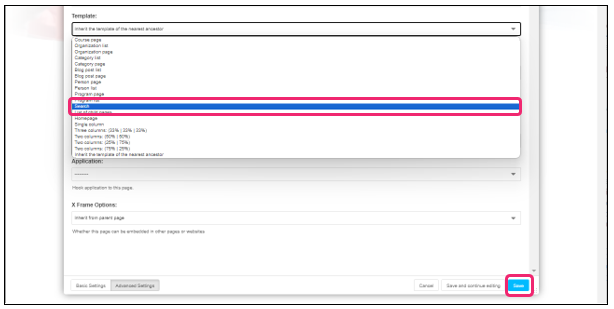
Select Save.
These are just the minimal set of contents required. A more thorough addition of contents for the CMS will be performed by the Richie CMS administrator as part of the day to day operation of the site. Please refer to the Richie CMS Administrator section of this documentation for more information.
3.7.6.4. Configurations for the new tenant in Open edX#
In this section we will cover the initial set of configurations that will need to be added to platform to allow the addition of a new tenant.
3.7.6.4.1. Create the Second Organization#
Organizations are created by the Open edX Administrator and they are linked to the tenants. This is how a tenant is able to decide which courses it is going to show.
In order to get the platform started, we are going to create the second organization, with the short name: my_second_organization.
Please refer to the following section this documentation for the step by step procedure: https://docs.globalteachercampus.org/en/latest/user_guides_by_role/administrators/Open_edX_admin.html#organizations
In the next section, we are going to create and configure the new tenant which will be linked to this organization.
3.7.6.4.2. Create the new Site#
You need to create a simple record to define the existence of each of your LMS sites.
Access the Django administrator console with the administrator credentials at https://YOUR_MAIN_DOMAIN/admin.
Visit https://YOUR_MAIN_DOMAIN/admin/sites/site/.
Create a new record for the LMS tenant and provide the value for YOUR_LMS2_DOMAIN in both fields: (Domain name and Display name)
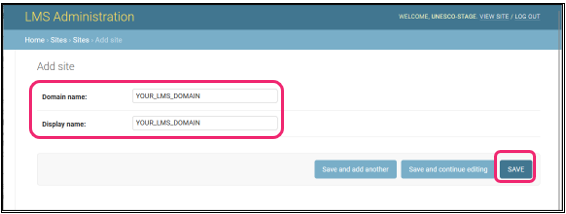
Save your changes.
3.7.6.4.3. Create and Configure the New Tenant#
To add the new tenant to the Open edX platform, follow the instructions below:
Access the Django administrator console with the administrator credentials at https://YOUR_MAIN_DOMAIN/admin/.
Visit https://YOUR_MAIN_DOMAIN/admin/eox_tenant/tenantconfig/.
Create a new record for the LMS tenant and provide a unique identifier for the external key.
Populate the LMS configs field with the required configurations and Save your changes.
As part of this step you will be adjusting the configuration and branding of the tenant record to match the needs of the new tenant.
Here is a boilerplate that can be used for these configurations, replacing all the required fields with your own domains and branding assets:
 {
   "CONTACT_EMAIL": "contact@example.com",
   "EDNX_CUSTOM_PATH_REDIRECTS": {
       "/richie/en": {
           "redirect_always": "https://YOUR_CMS2_DOMAIN"
       },
       "/richie/fr": {
           "redirect_always": "https://YOUR_CMS2_DOMAIN"
       }
   },
   "EDNX_USE_SIGNAL": true,
   "ENABLE_COMBINED_LOGIN_REGISTRATION": false,
   "ENABLE_LEARNER_RECORDS": false,
   "ENABLE_NEW_EDITOR_PAGES": true,
   "ENABLE_PROFILE_MICROFRONTEND": true,
   "FEATURES": {
       "CERTIFICATES_INSTRUCTOR_GENERATION": true,
       "ENABLE_COURSEWARE_SEARCH": true,
       "ENABLE_COURSE_DISCOVERY": true,
       "ENABLE_DASHBOARD_SEARCH": true,
       "ENABLE_EDXNOTES": true,
       "ENABLE_INSTRUCTOR_BACKGROUND_TASKS": true,
       "ENABLE_UNICODE_USERNAME": false
   },
   "HOMEPAGE_COURSE_MAX": 16,
   "LANGUAGE_CODE": "en",
   "LMS_BASE": "YOUR_LMS2_DOMAIN",
   "LMS_ROOT_URL": "https://YOUR_LMS2_DOMAIN",
   "MFE_CONFIG_OVERRIDES": {
       "account": {
           "FAVICON_URL": "https://YOUR_FILES_DOMAIN/favicon2.ico",
           "LOGO_TRADEMARK_URL": "https://YOUR_FILES_DOMAIN/logo-in-black2.webp",
           "LOGO_URL": "https://YOUR_FILES_DOMAIN/logo-in-blue2.webp"
       },
       "authn": {
           "FAVICON_URL": "https://YOUR_FILES_DOMAIN/favicon2.ico",
           "LOGO_TRADEMARK_URL": "https://YOUR_FILES_DOMAIN/logo-in-black2.webp",
           "LOGO_WHITE_URL": "https://YOUR_FILES_DOMAIN/logo-in-white2.webp",
           "PRIVACY_POLICY": "https://YOUR_CMS2_DOMAIN/your_privacy_url",
           "TOS_AND_HONOR_CODE": "https://YOUR_CMS2_DOMAIN/your_term_of_service_url"
       },
       "course_authoring": {
           "FAVICON_URL": "https://YOUR_FILES_DOMAIN/favicon2.ico",
           "LOGO_TRADEMARK_URL": "https://YOUR_FILES_DOMAIN/logo-in-black2.webp",
           "LOGO_URL": "https://YOUR_FILES_DOMAIN/logo-in-blue2.webp"
       },
       "discussions": {
           "FAVICON_URL": "https://YOUR_FILES_DOMAIN/favicon2.ico",
           "LOGO_TRADEMARK_URL": "https://YOUR_FILES_DOMAIN/logo-in-black2.webp",
           "LOGO_URL": "https://YOUR_FILES_DOMAIN/logo-in-blue2.webp",
           "SUPPORT_URL": "https://YOUR_CMS2_DOMAIN/your_support_url"
       },
       "learning": {
           "FAVICON_URL": "https://YOUR_FILES_DOMAIN/favicon2.ico",
           "LOGO_TRADEMARK_URL": "https://YOUR_FILES_DOMAIN/logo-in-black2.webp",
           "LOGO_URL": "https://YOUR_FILES_DOMAIN/logo-in-blue2.webp",
           "PARAGON_THEME_VARIANTS_LIGHT_URL": "https://css-varsify.s3.amazonaws.com/public/182e81a8-f6f1-4d2b-bdc4-d4741f03782a.css",
           "SUPPORT_URL": "https://YOUR_CMS2_DOMAIN/your_support_url"
       },
       "profile": {
           "FAVICON_URL": "https://YOUR_FILES_DOMAIN/favicon2.ico",
           "LOGO_TRADEMARK_URL": "https://YOUR_FILES_DOMAIN/logo-in-black2.webp",
           "LOGO_URL": "https://YOUR_FILES_DOMAIN/logo-in-blue2.webp"
       }
   },
   "MKTG_REDIRECTS": {
       "about.html": "",
       "contact.html": "",
       "faq.html": "",
       "honor.html": "",
       "privacy.html": "",
       "tos.html": ""
   },
   "MKTG_URLS": {
       "COURSES": "/courses",
       "ROOT": "https://YOUR_CMS2_DOMAIN"
   },
   "PLATFORM_NAME": "Global Teacher Campus - additional site",
   "SITE_NAME": "YOUR_LMS2_DOMAIN",
   "SUPPORT_SITE_LINK": "https://YOUR_CMS2_DOMAIN/your_support_url",
   "TECH_SUPPORT_EMAIL": "support@example.com",
   "THEME_OPTIONS": {
       "theme": {
           "name": "bragi-1e88e5",
           "parent": "bragi"
       }
   },
   "WIKI_ENABLED": false,
   "course_about_show_social_links": false,
   "course_org_filter": [
       "my_second_organization”
   ],
   "courses_banner_url": "https://YOUR_FILES_DOMAIN/yourbanner2.png",
   "courses_intro": {
       "paragraph": "",
       "subtitle": "Online courses Global Teacher Campus",
       "title": "Course Catalog Global Teacher Campus"
   },
   "courses_intro_colors": {
       "paragraph_color": "#FFF",
       "subtitle_color": "#FFF",
       "title_color": "#FFF"
   },
"dashboard_banner_url": "https://YOUR_FILES_DOMAIN/yourbanner2.png",
   "dashboard_intro": {
       "paragraph": "",
       "subtitle": "",
       "title": "Global Teacher Campus 2"
   },
   "dashboard_text": {
       "paragraph": "",
       "title": "Available Courses"
   },
   "email_from_address": "no-reply@example.com",
   "favicon_path": "https://YOUR_FILES_DOMAIN/favicon2.ico",
   "footer_colors": {
       "background": "",
       "color": "#fff",
       "color_link": "",
       "color_link_hover": "",
       "copy_color": "",
       "extra_background": "",
       "extra_color_link": "",
       "extra_color_link_hover": ""
   },
   "footer_copy": "",
   "footer_edunext_src": "https://d1uwn6yupg8lfo.cloudfront.net/edxsites/bragi-images/logo-small21.png",
   "footer_extralinks": [
       {
           "target": "_blank",
           "txt": "Privacy Policy",
           "url": "#"
       }
   ],
   "footer_links": [
       {
           "target": "_blank",
           "txt": "UNESCO",
           "url": "https://en.unesco.org/"
       }
   ],
   "footer_logo_src": "https://YOUR_FILES_DOMAIN/logo-in-black2.webp",
   "footer_openedx_src": "https://files.edx.org/openedx-logos/edx-openedx-logo-tag-light.png",
   "footer_social": [
       {
           "icon": "fa fa-facebook",
           "target": "_blank",
           "txt": "Facebook",
           "url": "https://www.facebook.com/unesco/"
       }
   ],
   "header_colors": {
       "account_background": "#ffffff",
       "account_background_hover": "#ffffff",
       "account_border": "",
       "account_border_hover": "#037bfc",
       "account_color": "#037bfc",
       "account_color_hover": "",
       "account_dropdown_account_color_link": "",
       "account_dropdown_account_color_link_hover": "",
       "account_dropdown_background": "#ffffff",
       "account_dropdown_background_link_hover": "#ffffff",
       "account_dropdown_border": "#037bfc",
       "background": "",
       "collapse_background": "#ffffff",
       "collapse_color_link": "",
       "collapse_color_link_hover": "#037bfc",
       "collapse_login_background": "#ffffff",
       "collapse_login_background_hover": "#ffffff",
       "collapse_login_border": "",
       "collapse_login_border_hover": "#037bfc",
       "collapse_login_color": "#037bfc",
       "collapse_login_color_hover": "",
       "collapse_login_radius": "",
       "collapse_login_radius_hover": "",
       "color": "#037bfc",
       "color_link": "",
       "color_link_hover": "#037bfc",
       "login_background": "#ffffff",
       "login_background_hover": "#ffffff",
       "login_border": "",
       "login_border_hover": "",
       "login_color": "#037bfc",
       "login_color_hover": "",
       "login_radius": "",
       "login_radius_hover": "#037bfc"
   },
   "header_langselector": true,
   "header_links": [
       {
           "txt": "Courses",
           "url": "https://YOUR_CMS2_DOMAIN/en/courses/"
       }
   ],
   "home_banner_url": "https://YOUR_FILES_DOMAIN/yourbanner2.png",
   "home_intro": {
       "paragraph": "",
       "search": {
           "icon": "fa fa-search",
           "placeholder": "Search",
           "text": "Search"
       },
       "subtitle": "",
       "title": "Global Teacher Campus"
   },
   "home_intro_colors": {
       "background": "",
       "paragraph_color": "#FFF",
       "search_button_background": "",
       "search_button_border": "",
       "search_button_color": "",
       "search_button_hover_background": "",
       "search_button_hover_border": "",
       "search_button_hover_color": "",
       "search_button_hover_shadow": "",
       "search_button_radius": "",
       "search_button_shadow": "",
       "subtitle_color": "#FFF",
       "title_color": "#FFF"
   },
   "home_text": {
       "paragraph": "",
       "title": "Available Courses "
   },
   "html_email_logo_path": "https://YOUR_FILES_DOMAIN/logo-in-blue2.webp",
   "logo_image_url": "https://YOUR_FILES_DOMAIN/logo-in-blue2.webp",
   "platform_name": "Global Teacher Campus - additional site",
   "released_languages": "en"
 }
3.7.6.4.4. Create Users for this additional tenant#
Now that the platform has an LMS site, it can start accepting registration of new users.
Any user, including learners, but also course creators, course validators, data analysts and even administrators, will need to go through the registration procedure starting from the LMS registration that will be published at https://YOUR_LMS2_DOMAIN/register.
Keep in mind that if a user was already registered for one of the tenants in the same installation, they will not be able to register again and the existing credentials will sufice to log in to the additional tenant.
Also note, that when creating a new tenant, there is nothing that needs to be done to the Custom Course Validation workflow component or to the Aspects data analytics platform.
From this point forward, the standard management operations would need to be performed on the new tenant, for example to: - grant course creator permissions to some users in the second organization - create the corresponding validation rules for the new organization in the course validation workflow.