
3.7.5. Post Installation Configurations#
3.7.5.1. Post Installation Configurations for Richie CMS#
Once the Richie CMS platform is operational, it needs to be populated with a minimal set of records explained in this section to make it operational and fit for purpose.
3.7.5.1.1. Definition of the Site#
You need to create a simple record to define the existence of your site.
Access the Django administrator console with the Richie administrator credentials at https://YOUR_CMS_DOMAIN/admin/.
Visit https://YOUR_CMS_DOMAIN/admin/sites/site/.
Create a new record for the site and provide the value for YOUR_CMS_DOMAIN and a Display name.
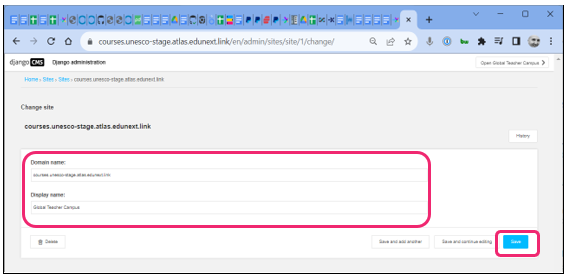
Save your changes.
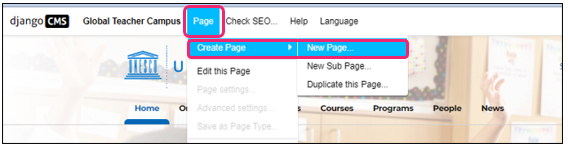
3.7.5.1.2. Definition of a Homepage#
A homepage needs to be created for your CMS.
Login to the Richie administrator interface with your Admin credentials at https://YOUR_CMS_DOMAIN/admin/.
From the top menu, navigate to Page > Create Page > and select New Page option.
Provide a title and the desired Slug.
Select Save and continue editing.
Select Advanced settings.
Select the Homepage template.
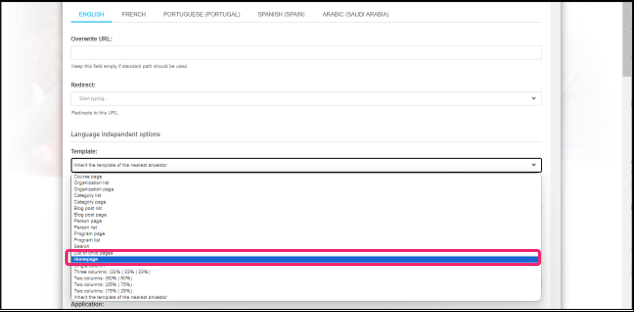
Select Save.
3.7.5.1.3. Definition of the First Organization#
In order to maintain consistency with the Open edX platform, every organization that is created there, also needs to be created in Richie CMS. As part of the initial configurations, we are going to create one organization my_first_organization both in Richie and in Open edX.
This section will describe the process for Richie CMS step by step.
Login to the Richie administrator interface with your Admin credentials at https://YOUR_CMS_DOMAIN/admin.
Go to the Create button to create a new organization page.

Select the blue box New Organization and then click on Next.

Provide the organization title and make sure that the slug is my_first_organization, then go to the button Create.
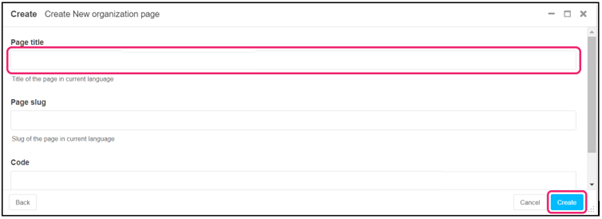
Save your changes.
3.7.5.1.4. Definition of the Course Catalog Page#
Login to the Richie administrator interface with your Admin credentials at https://YOUR_CMS_DOMAIN/admin/.
From the top menu, navigate to Page > Create Page > and select New Page option.
Provide a title and the desired Slug.
Select Save and continue editing.
Select Advanced settings.
Select the Search template.
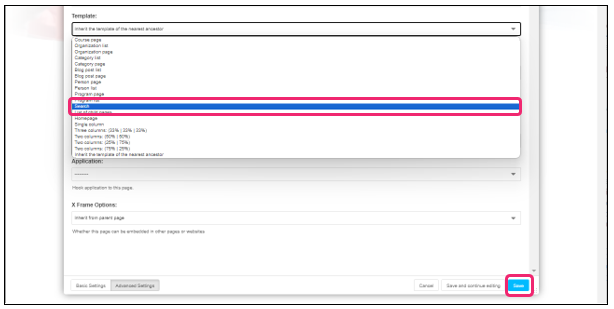
Select Save.
These are just the minimal set of contents required. A more thorough addition of contents for the CMS will be performed by the Richie CMS administrator as part of the day to day operation of the site. Please refer to the Richie CMS Administrator section of this documentation for more information.
3.7.5.2. Post Installation Configurations for Open edX#
In this section we will cover the initial set of configurations that will need to be added to the platform to allow it to be operational and fit for purpose.
3.7.5.2.1. Create the First Organization#
One important concept in the Open edX platform is that of organizations. Organizations are the entities that are offering the online courses.
Organizations are created by the Open edX Administrator and they are linked to the tenants. This is how a tenant is able to decide which courses it is going to show.
In order to get the platform started, we are going to create a first organization, with the short name: my_first_organization.
Please refer to the following section this documentation for the step by step procedure: https://docs.globalteachercampus.org/en/latest/user_guides_by_role/administrators/Open_edX_admin.html#organizations
In the next section, we are going to create and configure the first tenant which will be linked to this organization.
3.7.5.2.2. Create the Initial Site#
You need to create a simple record to define the existence of each of your LMS sites.
Access the Django administrator console with the administrator credentials at https://YOUR_MAIN_DOMAIN/admin.
Visit https://YOUR_MAIN_DOMAIN/admin/sites/site/.
Create a new record for the LMS tenant and provide the value for YOUR_LMS_DOMAIN in both fields: (Domain name and Display name)
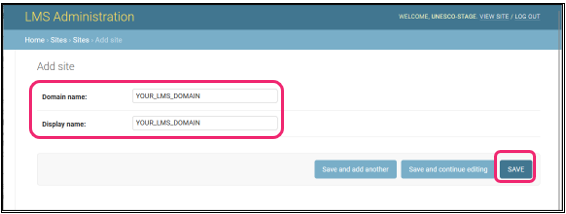
Save your changes.
3.7.5.2.3. Create and Configure the Initial Tenants#
The Open edX platform, at the center of the GTC platform, has multi-tenant capabilities, which means that it needs at least one LMS tenant to be properly created and configured to start with.
In addition to this, the course validation workflow requires certain specific configurations to be added to STUDIO, so the best way to do this is to add one tenant for STUDIO as well.
To add these 2 initial tenants follow the instructions below:
Access the Django administrator console with the administrator credentials at https://YOUR_MAIN_DOMAIN/admin/.
Visit https://YOUR_MAIN_DOMAIN/admin/eox_tenant/tenantconfig/.
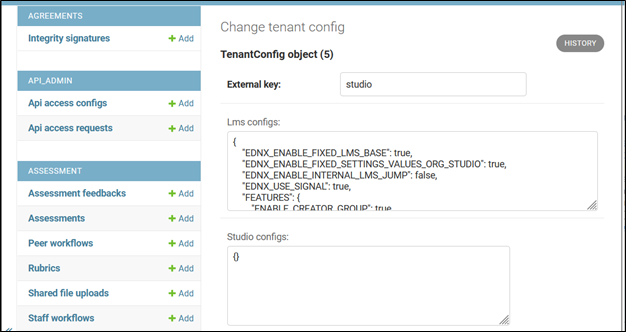
Create a new record for the LMS tenant and provide a unique identifier for the external key.
Populate the LMS configs field with the required configurations and Save your changes.
Here is a boilerplate that can be used for these configurations, replacing all the required fields with your own domains and branding assets:
 {
   "CONTACT_EMAIL": "contact@example.com",
   "EDNX_CUSTOM_PATH_REDIRECTS": {
       "/richie/en": {
           "redirect_always": "https://YOUR_CMS_DOMAIN"
       },
       "/richie/fr": {
           "redirect_always": "https://YOUR_CMS_DOMAIN"
       }
   },
   "EDNX_USE_SIGNAL": true,
   "ENABLE_COMBINED_LOGIN_REGISTRATION": false,
   "ENABLE_LEARNER_RECORDS": false,
   "ENABLE_NEW_EDITOR_PAGES": true,
   "ENABLE_PROFILE_MICROFRONTEND": true,
   "FEATURES": {
       "CERTIFICATES_INSTRUCTOR_GENERATION": true,
       "ENABLE_COURSEWARE_SEARCH": true,
       "ENABLE_COURSE_DISCOVERY": true,
       "ENABLE_DASHBOARD_SEARCH": true,
       "ENABLE_EDXNOTES": true,
       "ENABLE_INSTRUCTOR_BACKGROUND_TASKS": true,
       "ENABLE_UNICODE_USERNAME": false
   },
   "HOMEPAGE_COURSE_MAX": 16,
   "LANGUAGE_CODE": "en",
   "LMS_BASE": "YOUR_LMS_DOMAIN",
   "LMS_ROOT_URL": "https://YOUR_LMS_DOMAIN",
   "MFE_CONFIG_OVERRIDES": {
       "account": {
           "FAVICON_URL": "https://YOUR_FILES_DOMAIN/favicon.ico",
           "LOGO_TRADEMARK_URL": "https://YOUR_FILES_DOMAIN/logo-in-black.webp",
           "LOGO_URL": "https://YOUR_FILES_DOMAIN/logo-in-blue.webp"
       },
       "authn": {
           "FAVICON_URL": "https://YOUR_FILES_DOMAIN/favicon.ico",
           "LOGO_TRADEMARK_URL": "https://YOUR_FILES_DOMAIN/logo-in-black.webp",
           "LOGO_WHITE_URL": "https://YOUR_FILES_DOMAIN/logo-in-white.webp",
           "PRIVACY_POLICY": "https://YOUR_CMS_DOMAIN/your_privacy_url",
           "TOS_AND_HONOR_CODE": "https://YOUR_CMS_DOMAIN/your_term_of_service_url"
       },
       "course_authoring": {
           "FAVICON_URL": "https://YOUR_FILES_DOMAIN/favicon.ico",
           "LOGO_TRADEMARK_URL": "https://YOUR_FILES_DOMAIN/logo-in-black.webp",
           "LOGO_URL": "https://YOUR_FILES_DOMAIN/logo-in-blue.webp"
       },
       "discussions": {
           "FAVICON_URL": "https://YOUR_FILES_DOMAIN/favicon.ico",
           "LOGO_TRADEMARK_URL": "https://YOUR_FILES_DOMAIN/logo-in-black.webp",
           "LOGO_URL": "https://YOUR_FILES_DOMAIN/logo-in-blue.webp",
           "SUPPORT_URL": "https://YOUR_CMS_DOMAIN/your_support_url"
       },
       "learning": {
           "FAVICON_URL": "https://YOUR_FILES_DOMAIN/favicon.ico",
           "LOGO_TRADEMARK_URL": "https://YOUR_FILES_DOMAIN/logo-in-black.webp",
           "LOGO_URL": "https://YOUR_FILES_DOMAIN/logo-in-blue.webp",
           "PARAGON_THEME_VARIANTS_LIGHT_URL": "https://css-varsify.s3.amazonaws.com/public/182e81a8-f6f1-4d2b-bdc4-d4741f03782a.css",
           "SUPPORT_URL": "https://YOUR_CMS_DOMAIN/your_support_url"
       },
       "profile": {
           "FAVICON_URL": "https://YOUR_FILES_DOMAIN/favicon.ico",
           "LOGO_TRADEMARK_URL": "https://YOUR_FILES_DOMAIN/logo-in-black.webp",
           "LOGO_URL": "https://YOUR_FILES_DOMAIN/logo-in-blue.webp"
       }
   },
   "MKTG_REDIRECTS": {
       "about.html": "",
       "contact.html": "",
       "faq.html": "",
       "honor.html": "",
       "privacy.html": "",
       "tos.html": ""
   },
   "MKTG_URLS": {
       "COURSES": "/courses",
       "ROOT": "https://YOUR_CMS_DOMAIN"
   },
   "PLATFORM_NAME": "Global Teacher Campus",
   "SITE_NAME": "YOUR_LMS_DOMAIN",
   "SUPPORT_SITE_LINK": "https://YOUR_CMS_DOMAIN/your_support_url",
   "TECH_SUPPORT_EMAIL": "support@example.com",
   "THEME_OPTIONS": {
       "theme": {
           "name": "bragi-1e88e5",
           "parent": "bragi"
       }
   },
   "WIKI_ENABLED": false,
   "course_about_show_social_links": false,
   "course_org_filter": [
       "my_first_organization”
   ],
   "courses_banner_url": "https://YOUR_FILES_DOMAIN/yourbanner.png",
   "courses_intro": {
       "paragraph": "",
       "subtitle": "Online courses Global Teacher Campus",
       "title": "Course Catalog Global Teacher Campus"
   },
   "courses_intro_colors": {
       "paragraph_color": "#FFF",
       "subtitle_color": "#FFF",
       "title_color": "#FFF"
   },
"dashboard_banner_url": "https://YOUR_FILES_DOMAIN/yourbanner.png",
   "dashboard_intro": {
       "paragraph": "",
       "subtitle": "",
       "title": "Global Teacher Campus"
   },
   "dashboard_text": {
       "paragraph": "",
       "title": "Available Courses"
   },
   "email_from_address": "no-reply@example.com",
   "favicon_path": "https://YOUR_FILES_DOMAIN/favicon.ico",
   "footer_colors": {
       "background": "",
       "color": "#fff",
       "color_link": "",
       "color_link_hover": "",
       "copy_color": "",
       "extra_background": "",
       "extra_color_link": "",
       "extra_color_link_hover": ""
   },
   "footer_copy": "",
   "footer_edunext_src": "https://d1uwn6yupg8lfo.cloudfront.net/edxsites/bragi-images/logo-small21.png",
   "footer_extralinks": [
       {
           "target": "_blank",
           "txt": "Privacy Policy",
           "url": "#"
       }
   ],
   "footer_links": [
       {
           "target": "_blank",
           "txt": "UNESCO",
           "url": "https://en.unesco.org/"
       }
   ],
   "footer_logo_src": "https://YOUR_FILES_DOMAIN/logo-in-black.webp",
   "footer_openedx_src": "https://files.edx.org/openedx-logos/edx-openedx-logo-tag-light.png",
   "footer_social": [
       {
           "icon": "fa fa-facebook",
           "target": "_blank",
           "txt": "Facebook",
           "url": "https://www.facebook.com/unesco/"
       }
   ],
   "header_colors": {
       "account_background": "#ffffff",
       "account_background_hover": "#ffffff",
       "account_border": "",
       "account_border_hover": "#037bfc",
       "account_color": "#037bfc",
       "account_color_hover": "",
       "account_dropdown_account_color_link": "",
       "account_dropdown_account_color_link_hover": "",
       "account_dropdown_background": "#ffffff",
       "account_dropdown_background_link_hover": "#ffffff",
       "account_dropdown_border": "#037bfc",
       "background": "",
       "collapse_background": "#ffffff",
       "collapse_color_link": "",
       "collapse_color_link_hover": "#037bfc",
       "collapse_login_background": "#ffffff",
       "collapse_login_background_hover": "#ffffff",
       "collapse_login_border": "",
       "collapse_login_border_hover": "#037bfc",
       "collapse_login_color": "#037bfc",
       "collapse_login_color_hover": "",
       "collapse_login_radius": "",
       "collapse_login_radius_hover": "",
       "color": "#037bfc",
       "color_link": "",
       "color_link_hover": "#037bfc",
       "login_background": "#ffffff",
       "login_background_hover": "#ffffff",
       "login_border": "",
       "login_border_hover": "",
       "login_color": "#037bfc",
       "login_color_hover": "",
       "login_radius": "",
       "login_radius_hover": "#037bfc"
   },
   "header_langselector": true,
   "header_links": [
       {
           "txt": "Courses",
           "url": "https://YOUR_CMS_DOMAIN/en/courses/"
       }
   ],
   "home_banner_url": "https://YOUR_FILES_DOMAIN/yourbanner.png",
   "home_intro": {
       "paragraph": "",
       "search": {
           "icon": "fa fa-search",
           "placeholder": "Search",
           "text": "Search"
       },
       "subtitle": "",
       "title": "Global Teacher Campus"
   },
   "home_intro_colors": {
       "background": "",
       "paragraph_color": "#FFF",
       "search_button_background": "",
       "search_button_border": "",
       "search_button_color": "",
       "search_button_hover_background": "",
       "search_button_hover_border": "",
       "search_button_hover_color": "",
       "search_button_hover_shadow": "",
       "search_button_radius": "",
       "search_button_shadow": "",
       "subtitle_color": "#FFF",
       "title_color": "#FFF"
   },
   "home_text": {
       "paragraph": "",
       "title": "Available Courses "
   },
   "html_email_logo_path": "https://YOUR_FILES_DOMAIN/logo-in-blue.webp",
   "logo_image_url": "https://YOUR_FILES_DOMAIN/logo-in-blue.webp",
   "platform_name": "Global Teacher Campus",
   "released_languages": "en,fr,pt-PT,ar,es-419"
 }
Create a new record for the STUDIO tenant and provide a unique identifier for the external key.
Populate the LMS configs field with the required configurations and Save your changes.
Here is a boilerplate that can be used for these configurations, replacing all the required fields with your own domains and branding assets:
{
  "EDNX_ENABLE_FIXED_LMS_BASE": true,
  "EDNX_ENABLE_FIXED_SETTINGS_VALUES_ORG_STUDIO": true,
  "EDNX_ENABLE_INTERNAL_LMS_JUMP": false,
  "EDNX_USE_SIGNAL": true,
  "FEATURES": {
      "ENABLE_CREATOR_GROUP": true
  },
  "LANGUAGE_CODE": "en",
  "OPEN_EDX_FILTERS_CONFIG": {
      "org.openedx.studio.contentstore.modify_usage_key_request.started.v1": {
          "fail_silently": false,
          "pipeline": [
              "platform_global_teacher_campus.filters.pipeline.ModifyRequestToBlockCourse"
          ]
      },
      "org.openedx.studio.manages.force_publish.render.started.v1": {
          "fail_silently": false,
          "pipeline": [
              "platform_global_teacher_campus.filters.pipeline.StopForcePublishCourseRender"
          ]
      }
  },
  "PLATFORM_NAME": "Studio",
  "PUBLISH_COURSE": false,
  "SITE_NAME": "YOUR_STUDIO_DOMAIN",
  "VALIDATION_PANEL_MICROFRONTEND_URL": "https://YOUR_MFES_DOMAIN/validation-panel"
}
3.7.5.2.4. Create Additional Users for the Platform#
Now that the platform has an LMS site, it can start accepting registration of new users.
Any user, including learners, but also course creators, course validators, data analysts and even administrators, will need to go through the registration procedure starting from the LMS registration that will be published at https://YOUR_LMS_DOMAIN/register.
3.7.5.2.5. Grant Course Creator Permissions to Some Users for the Platform#
Once a user has been registered, the administrator can grant them special permissions, for example course creator permissions in the platform.
Please refer to the Administrator user documentation for the step by step procedure.
3.7.5.2.6. Other Setting in Open edX DB#
There are a number of settings that can be added or modified by an open edX administrator via the Django admin console.
In this section we are going to summarize the most important of such settings, which are required to have a functional platform.
3.7.5.2.6.1. Waffle Flags#
The platform allows for some flexible configuration of its settings to allow for experimentation and gradual release of new features.
This flexible configuration is done via the addition of waffle flags. Each waffle flag is added following the procedure below:
Access the Django administrator console with the administrator credentials at https://YOUR_MAIN_DOMAIN/admin/.
Visit https://YOUR_MAIN_DOMAIN/admin/waffle/flag/.
Create a new record for each flag and populate the Name and Everyone fields as described in the image:
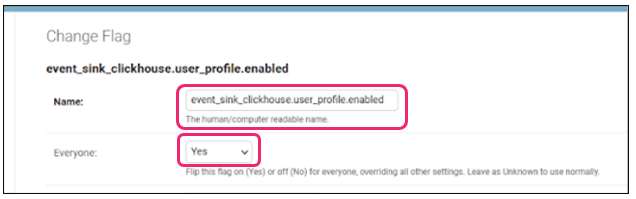
Save your changes.
This is the list of recommended waffle flags to be added for a new GTC platform:
event_sink_clickhouse.user_profile.enabled
event_sink_clickhouse.course_overviews.enabled
new_core_editors.use_new_text_editor
new_core_editors.use_new_video_editor
new_core_editors.use_new_problem_editor
account.redirect_to_microfrontend
learner_profile.redirect_to_microfrontend
discussions.enable_learners_stats
discussions.enable_reported_content_email_notifications
discussions.enable_moderation_reason_codes
discussions.enable_learners_tab_in_discussions_mfe
discussions.enable_discussions_mfe
course_home.course_home_mfe_progress_tab
discussions.pages_and_resources_mfe
studio.enable_checklists_quality
grades.writable_gradebook
grades.enforce_freeze_grade_after_course_end
grades.rejected_exam_overrides_grade
3.7.5.2.6.2. Waffle Switches#
Similar to the Waffle flags, you can add waffle switches for some flexible configuration of the platform behavior. Each waffle switch is added following the procedure below:
Access the django administrator console with the administrator credentials at https://YOUR_MAIN_DOMAIN/admin/.
Visit https://YOUR_MAIN_DOMAIN/admin/waffle/switch/.
Create a new record for each Switch and populate the Name and check the Active field box as described in the image:
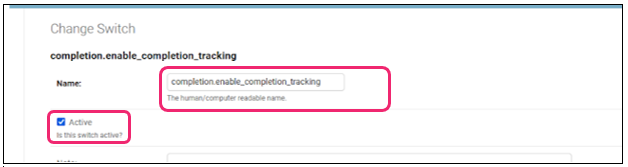
Save your changes.
This is the list of recommended waffle flags to be added for a new GTC platform:
completion.enable_completion_tracking
3.7.5.2.6.3. Bulk Email Flag#
This is a simple setting that enables course instructors to communicate with learners via bulk email.
Access the Django administrator console with the administrator credentials at https://YOUR_MAIN_DOMAIN/admin/.
Visit https://YOUR_MAIN_DOMAIN/admin/bulk_email/bulkemailflag/.
Select the Add bulk email flag button.
Check the Enabled box and do not mark require course email auth box.
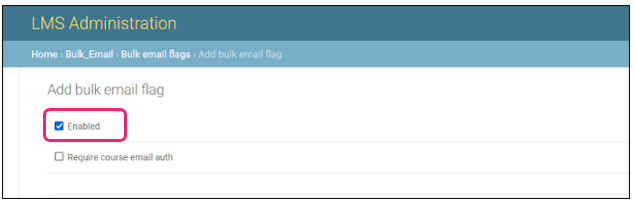
Save your changes.
3.7.5.2.7. Custom Email Templates#
The platform uses a predefined template for the emails that are sent to learners. This template needs to be adjusted according to the name and branding conventions of the specific initiative.
Access the Django administrator console with the administrator credentials at https://YOUR_MAIN_DOMAIN/admin/.
Visit https://YOUR_MAIN_DOMAIN/admin/bulk_email/courseemailtemplate/1/change/.
Select the Course email templates button.
Make the desired changes in the template, both in HTML and Plain text versions.
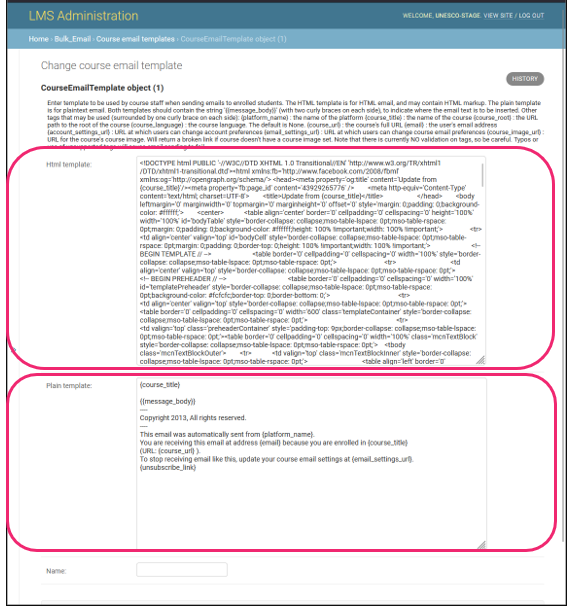
Save your changes.
3.7.5.2.8. Certificate Generation Configuration#
This is a setting that enables the generation of certificates after course completion.
Access the Django administrator console with the administrator credentials at https://YOUR_MAIN_DOMAIN/admin/.
Visit https://YOUR_MAIN_DOMAIN/admin/certificates/certificategenerationconfiguration/.
Select the Add certificate configuration generation button.
Check the Enabled box.
Save your changes.
3.7.5.2.9. Certificate Template#
The platform allows the definition of a certificate template in HTML to be used either across all courses, by all the courses in one organization or either by one individual course.
An initial configuration would be for a template to be applied to all courses.
Access the Django administrator console with the administrator credentials at https://YOUR_MAIN_DOMAIN/admin/.
Visit https://YOUR_MAIN_DOMAIN/admin/certificates/certificatetemplate/.
Select the Add certificate template button.
Provide a Name and the HTML template.
Here is the recommended template you can use and adjust according to your specific needs:
<%namespace name='static' file='/static_content.html'/>
<%!
from django.utils.translation import ugettext as _
from common.djangoapps.student.models import anonymous_id_for_user
from opaque_keys.edx.keys import CourseKey
from hashlib import sha256
%>
<%
# set doc language direction
from django.utils.translation import get_language_bidi
dir_rtl = 'rtl' if get_language_bidi() else 'ltr'
course_mode_class = course_mode if course_mode else ''
%>
<!DOCTYPE html>
<html class="no-js" lang="en">
<head dir="${dir_rtl}">
  <meta http-equiv="X-UA-Compatible" content="IE=edge">
  <meta charset="utf-8">
  <meta name="viewport" content="width=device-width, initial-scale=1">
  <title>${document_title}</title>
  <%static:css group='style-certificates'/>
  <link rel="stylesheet" type="text/css" href="https://d1uwn6yupg8lfo.cloudfront.net/edxsites/certificates/ednxt_certificate.1621326.css">
  <style>
  .linkedin-button, .download-button {
    margin-top: 24px;
    margin-bottom: 0;
    }
  </style>
  <%static:optional_include_mako file="cert-head-extra.html" is_theming_enabled="True" />
</head>
  <body class="layout-accomplishment view-valid-accomplishment ${dir_rtl} certificate certificate-${course_mode_class} ednxt-certificate__container" data-view="valid-accomplishment">
    <div class="wrapper-view" dir="${dir_rtl}">
      <p></p>
      <p></p>
      <hr class="divider sr-only">
      % if user.is_authenticated and user.id == int(accomplishment_user_id):
        <%include file="/certificates/_accomplishment-banner.html" />
        <div class="wrapper-banner wrapper-banner-user">
          <section class="banner banner-user">
            <div class="message message-block message-notice">
              <div class="wrapper-copy-and-actions">
                <div class="message-actions">
                  <div class="linkedin-button"><a href="https://www.linkedin.com/profile/add" target="_blank"><img src="https://download.linkedin.com/desktop/add2profile/buttons/en_US.png " alt="LinkedIn Add to Profile button"></a></div>
<div class="download-button"><a href="//pdfcrowd.com/url_to_pdf/?use_print_media=1&height=230mm&width=297mm"
   onclick="if(!this.p)href+='&url='+encodeURIComponent(location.href);this.p=1">Save to PDF</a></div>
                </div>
              </div>
            </div>
          </section>

        </div>
      % endif


      <div class="ednxt-container">
        <div class="ednxt-certificate">
          <div class="ednxt-certificate__header">
            <div class="ednxt-certificate__header-logo" style="width: 100%;">
              <a href="${certificate_url_large if certificate_url_large else logo_url}">
                <img src="${certificate_logo_large if certificate_logo_large else logo_src}" alt="${certificate_logo_large_alt if certificate_logo_large_alt else platform_name}" style="max-height: none;">
              </a>
            </div>
          </div>
      <div class="ednxt-certificate__header">
        <h1 class="ednxt-certificate__header-title" style="width: 99%; text-transform: none;">${document_title}</h1>
      </div>
          <div class="ednxt-certificate__content">
            <span class="ednxt-certificate__content-detail">${certificate_description if certificate_description else 'This is to certify that'}</span>
            <span class="ednxt-certificate__content-recipient">${accomplishment_copy_name | h}</span>
            <span class="ednxt-certificate__content-summary">${accomplishment_copy_description_full}</span>
            <span class="ednxt-certificate__content-course">
              <span class="number">${course_number}</span>${course_number_separator if course_number_separator else ':'}
              <span class="name">${accomplishment_copy_course_name}</span>
            </span>
            <span class="ednxt-certificate__content-description">${accomplishment_copy_course_description} </span>
          </div>
          <div class="ednxt-certificate__footer">
            <div class="ednxt-certificate__footer-signatures">
              % if mode != 'base':
                <h3 class="sr-only">${_("Noted by")}</h3>
                <div class="ednxt-certificate__footer-signatories">
                  % if certificate_data:
                    % for signatory in certificate_data.get('signatories', []):
                    <div class="ednxt-certificate__footer-signatory">
                      <img class="ednxt-certificate__footer-signatory_signature" src="${static.url(signatory['signature_image_path'])}" alt="${signatory['name']}">
                      <h4 class="ednxt-certificate__footer-signatory_name">${signatory['name']}</h4>
                      <p class="ednxt-certificate__footer-signatory_credentials">
                        <span class="role">${signatory['title']}</span>
                        <span class="organization">${signatory['organization']}</span>
                      </p>
                    </div>
                    % endfor
                  % endif
                </div>
              % endif
            </div>
            <div class="ednxt-certificate__footer-information">
              <div class="ednxt-certificate__footer-information_logo">
                <h3 class="sr-only">${_("Supported by the following organizations")}</h3>
                   <img src="${logo_src}" alt="${platform_name}">
              </div>
              <div class="ednxt-certificate__footer-information_date">
                <span class="title">${certificate_date_issued_title}</span>
                <span class="value">${certificate_date_issued}</span>
              </div>
              <div class="ednxt-certificate__footer-information_id">
                <span class="title">${certificate_id_number_title}${certificate_id_number_separator if certificate_id_number_separator else ':'}</span>
                <span class="value"><a href="${logo_url}/certificates/${certificate_id_number}">${certificate_id_number}</a></span>
              </div>
            </div>
            <div class="ednxt-certificate__footer-link">
              <a href="${logo_url}/certificates/${certificate_id_number}">${logo_url}/certificates/${certificate_id_number}</a>
            </div>
          </div>
        </div>
      </div>


      <div class="wrapper-about">
        <aside role="complementary" class="about" aria-label="About edX Certificates">
          <%include file="/certificates/_about-edx.html" />
          <%include file="/certificates/_about-accomplishments.html" />
        </aside>
      </div>


      <%include file="/certificates/_accomplishment-footer.html" />
      <hr class="divider sr-only">
    </div>


    <%include file="/certificates/_assets-secondary.html" />
    %if badge:
      <%include file="/certificates/_badges-modal.html" />
    %endif


  </body>
</html>
Make sure to check the Is active box.
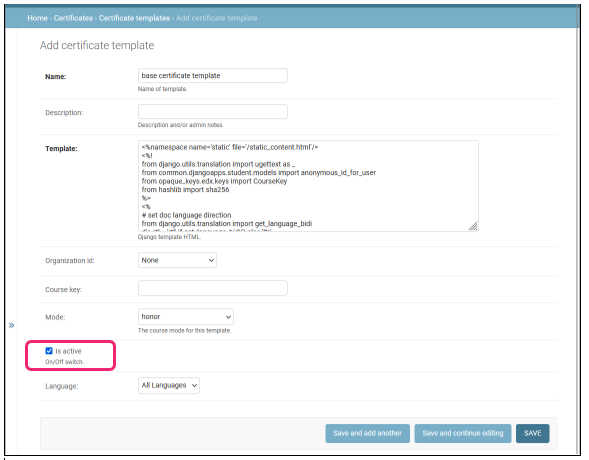
Save your changes.